Making my WordPress blog Retina Display friendly
The rule of thumb for making an image looks crisper on retina display is to double the resolution. Meaning, is previously the size of image is 100×100 px, on retina display, the same image with 200×200 px should be used.
There are quite a number of implementation out there to replace image that is used on web with the higher resolution version on the fly. But, I found the following code being the simplest one. You can read the original article about this by zippykid here.
$(document).ready(function() {
    if (window.devicePixelRatio == 2) {

          var images = $("img.retina");

          // loop through the images and make them hi-res
          for(var i = 0; i < images.length; i++) {

            // create new image name
            var imageType = images[i].src.substr(-4);
            var imageName = images[i].src.substr(0, images[i].src.length - 4);
            imageName += "-2x" + imageType;

            //rename image
            images[i].src = imageName;
          }
     }
});
The code assumes that the image has been assigned with 'retina' class, as well as you have the ability to upload an image with twice the resolution of the original image, and prefixed with -2x.
For my blog, I'm using Flickr service to host of all the images that I use in my entries. With Flickr, you can't really control the filename of the image that you will use, so adding the '-2x' prefix to the image name that is uploaded to Flickr won't help. The above code can't be used as-is for the images that are hosted on Flickr.
The Flickr image URL takes the following format
https://farm{farm-id}.staticflickr.com/{server-id}/{id}_{secret}.jpg
	or
https://farm{farm-id}.staticflickr.com/{server-id}/{id}_{secret}_[mstzb].jpg
	or
https://farm{farm-id}.staticflickr.com/{server-id}/{id}_{o-secret}_o.(jpg|gif|png)
where the size letter suffixes are as follows:
s small square 75x75
q large square 150x150
t thumbnail, 100 on longest side
m small, 240 on longest side
n small, 320 on longest side
- medium, 500 on longest side
z medium 640, 640 on longest side
c medium 800, 800 on longest side#
b large, 1024 on longest side*
o original image, either a jpg, gif or png, depending on source format
* Before May 25th 2010 large photos only exist for very large original images.
# Medium 800 photos only exist after March 1st 2012.
Below is an example how the URL of the image hosted on Flickr looks like
https://farm9.staticflickr.com/8064/8162997970_7dc9b93186.jpg
During Flickr early days, there are not much sizes available to be used. The medium 500px size seems to be the most practical size to use in my blog, and since then, the width of my entry area is always 500px.
For the retina fix to work, the replacement image has to be at least double the resolution of the original image. From the list of sizes about, seems like I can use the b large size which is 1024px on longest side.

For the same image above, this is how the URL looks like for the b size of the image.
https://farm9.staticflickr.com/8064/8162997970_7dc9b93186_b.jpg
It seems that I can use the above Javascript code after all, where I only need to change the '-2x' prefix to '_b' prefix, like so
imageName += "_b" + imageType;
But wait. As stated in the list of sizes about, prior to May 25th 2010, the b large size is only available for very large original image. I don't know how large that is, but the images that I have been uploading all this while before this date is not large enough that the b large size image is generated.
Looking at the example below, this image that I uploaded on May 10th 2009 does not have b large size version available.

Unless you only start using Flickr to host your images after May 25th 2010, changing the suffix to '_b' will not work.
Why not using the original image then? The suffix is '_o', and the original image is guaranteed to be available, no matter when the image was uploaded to Flickr. So let compare the URL of the medium size image with the original size image.
https://farm9.staticflickr.com/8064/8162997970_7dc9b93186.jpg
https://farm9.staticflickr.com/8064/8162997970_9cf410552e_o.png
This won't work either, as stated in the Flickr URL explanation above, the original image has their own secret, as well as variable file extension, following image type of the original image uploaded (as explained here).
If you notice, the image id (i.e. 8162997970) is the same. So we now have to find a way of determining the id of the medium image, and query Flick of what the originalsecret for that image is. Then knowing the farm id, server id, image id, original secret and original file extension, we can then build an original email URL from this information.
This is where Flickr API comes in use. There is flickr.photos.getInfo API that we can use, where if we know the photo_id, we can then query the rest of information of that photo.
The id can be easily worked out form the medium size URL by using Javascript string manipulation functions like below.
s = "https://farm9.staticflickr.com/8064/8162997970_7dc9b93186.jpg";

// Remove the image extension from the URL
s = s.substr(0, s.length - 4);

// Remove the image size letter suffix (if any)
if (s.substr(s.length - 2, 1) == "_")
   s = s.substr(0, s.length - 2);

// Extract the Image ID
s = s.substr(s.lastIndexOf("/") + 1, s.length - s.lastIndexOf("/") - 1);
s = s.substr(0, s.indexOf("_"));
Once you have determined the if of the photo, then you can pass this to the flickr.photos.getInfo API. The easiest way to do this is by using JQuery's getJSON function.
You will need to have Flickr API Key. You can apply one for free. I will write separate entry on how to apply for Flickr API Key.
$.getJSON("http://api.flickr.com/services/rest/?method=flickr.photos.getInfo&api_key=yourapikey&photo_id=" + s + "&format=json&nojsoncallback=1", function(data) {
   document.writeln("Farm ID = " + data.photo.farm);
   document.writeln("Server ID = " + data.photo.server);
   document.writeln("Photo ID = " + data.photo.id);
   document.writeln("Original Secret = " + data.photo.originalsecret);
   document.writeln("Original Format = " + data.photo.originalformat);
});
With all the required information available now, we can now construct the original image URL
https://farm{data.photo.farm}.staticflickr.com/{data.photo.server}/{data.photo.id}_{data.photo.originalsecret}_o.{data.photo.originalformat}
Putting this together, this is how my retina.js looks like.
$(document).ready(function() {
   if (window.devicePixelRatio == 2) {
      var images = $("img");

      // loop through the images
      for(var i = 0; i < images.length; i++) {
         // only do this for image hosted on Flickr
         if (images[i].src.indexOf("flickr") > -1) {
            swapRetinaImage(images, i);
         }
      }
   }
});

function swapRetinaImage(images, i) {
   var s = images[i].src;
   var newSRC;

   // find the photo_id of the current image
   s = s.substr(0, s.length - 4);
   if (s.substr(s.length - 2, 1) == "_")
      s = s.substr(0, s.length - 2);
   s = s.substr(s.lastIndexOf("/") + 1, s.length - s.lastIndexOf("/") - 1);
   s = s.substr(0, s.indexOf("_"));

   $.getJSON("http://api.flickr.com/services/rest/?method=flickr.photos.getInfo&api_key=yourapikey&photo_id=" + s + "&format=json&nojsoncallback=1", function(data) {
      newSRC = "https://farm" + data.photo.farm + ".staticflickr.com/" + data.photo.server + "/" + data.photo.id + "_" + data.photo.originalsecret + "_o." + data.photo.originalformat;
      images[i].src = newSRC;
   });
}
For my blog, I'm placing the retina.js file in includes/js/ folder of my theme, then in the header.php, I just add the following line in the <head> section.
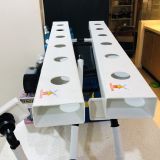
Let's look at this in action. For each of the example below, I'm loading the same image, but the second one will be replaced with the higher resolution photo when viewed on retina display.
These examples only works if you are viewing this on Apple's MacBook Pro with Retina Display or on iPad 3rd generation and above. If you are viewing this on a normal monitor, you will actually the same for both of photos in the pair.
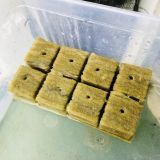
Example 1
Pay close attention to the serial sticker on that blue cooling fan. The text of the retina optimized photo should be easier to read.
Original display:

Optimised for retina display:
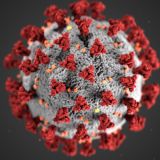
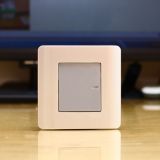
Example 2
Look at the hat that the doll on the left is wearing. There is much more clarity in the pattern of the have for the retina optimized photo.
Original display:

Optimised for retina display:
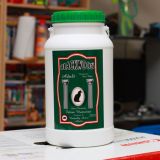
Example 3
Compare the face of the doll in both photos, especially the eyes. The eyes look shinier in the retina optimized photo.
Original display:

Optimised for retina display:


lagi smooth yek gambo tu..
ha ah. klu tgk kat ipad 3 atau macbook baru yg support retina display tu, perbezaan dia memang amat ketara